Tuesday 23 November 2010

Why did I choose white silk?

I was warned against working with white silk, I knew the risks and I still took the plunge. Beginning to understand the reasons behind the warnings, I have spent more time cleaning my work area than anything else.
There are 3 separate layers to my swan skirt, all in slightly different shades of cream, all to be invisible stitched together by hand.
It took about an hour and a half to do the first seam (above), this was before I attempted the feathered seam at the bottom. In total it was about 10 hours of hand stitching, I thought it would be a mission, but I found it really therapeutic when I got into it.

Glue it all together

Lovely looking isn't it, this is the glue to stick the plastazote together.
Its contact adhesive called evo-stick, you paint it to both surfaces to be stuck together wait until its mostly dry then press them together. And like magic, they bond, joined for eternity, its wonderful stuff.
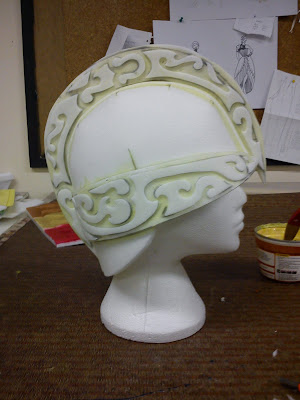
Here is the first stage of the helmet.
And the completed glueing. I stuck the details to the panels on the flat before bending the entire thing into shape.

Here is the pauldron, again I failed to take a picture of the gauntlet.

Cutting into the Plastazote

I traced out the patterns from my cardboard versions of the armour.
Then used a craft knife to cut them out of the plastazote.
I cut and traced all the main section of the helmet and pauldron onto 9mm, the gauntlet onto 6mm, and the pattern detail onto 2mm.

Then placed and pinned them all.

Designing the designs

Old norse designs and Celtic designs have a lot in common, so I used a lot of Celtic design books to inspire the patterns on my armour.
I spent the entire day working out the patterns. I incorporated a swan, a horse shoe, and a northern lights inspired swirl, into them all subtly in different places.

The designs had to be simple enough to be clear when cut out of the plastazote, but intricate enough to have a strong aesthetic impact.

Time for the Paper Armour

My costume has a helmet, a pauldron (for the shoulder) and a gauntlet. I an using plastazote to make them. First I needed to make cardboard mock-ups to get the patterns right.
Here is the front and and back of the helmet, with hindsight cello-tape would have worked better than masking tape.
To make the prototypes I basically made myself a nest of card, tape and armour books.
I need to figure out how to fasten the pauldron to my models shoulder, either D-rings and ribbon, or double sided body tape.
I didn't take a picture of the gauntlet before I dissembled it to take a pattern from, but there are lots of overlapping layers like there would be on a moveable gauntlet.

Tuesday 9 November 2010

Waddy-waddy

I really wanted the quilted skirt to be padded, to give it depth and a sense of 3D, but I couldn't pad it evenly all the way through because that would make the top too thick, or the bottom too thin. Luckily I discovered that the wadding is made in layers, and you can effectively grade it just by tearing off layers to different points.
I traced the pattern of feathers I drew on the calico onto pattern paper, with a few little neatenings along the way, then traced it all back onto more calico for the toile.
To create the different layers of feathers was a bit of a puzzle. I didn't have enough of any one of the (very kindly donated) silks to cover the entire wing expanse, so I am using slightly different ones for each of the 3 layers, they are like 3 complicated patchwork pieces. I think the slightly varying tones will give it a nice effect as well.
As it was only the toile I tried out about 6 different ways of attaching the pieces together, find out how to do it, see which one looked best, and how long each would take.
Surprise, surprise, it was the by far the most time consuming had sewing that looked by far the best. But never mind, I enjoy hand sewing (luckily). After that I put the now complete pieces right sides together, sewed round the edges, and tacked the carefully cut and graded wadding onto one side.
Then it was just a question of turning the whole thing inside out, quilting on the feather shapes, and gathering the waist onto the stand. The above is what was produced from all this, with some sari fabric underneath to show where the netting train will sit.
I was pleased with the overall shape of the wing, and the way the wadding worked. But I was unhappy with the feather shapes, they were just too pointy and made me think of fire breathing dragons rather than elegant swans. So I did some cutting, pinning and tacking of extra bits into place to see how curves would look. I definitely prefer the outer edge, and the inner one is slightly better, but now its a bit too flattened. I think the best one will be somewhere between the two, so like the pointed ends, but with a rounded tip.

And onto the skirt...

Its hard to know exactly where to start with the skirt, it not being a typical shape. So I used this pattern as a base.
It has a long train section, a version of which I think would look lovely underneath the folded wings.
I shuffled it around a bit, I ignored the stay section of the pattern and fitted it over the bustle. I does give a nice shape, but not quite what I wanted.
So I got a large piece of calico, pinned, tucked, and nudged it around into place.
Then I cut out the shape that I wanted. And went off to analyse swan wing anatomy for a while to get the feather shapes.
And after about an hour, drawing and redrawing, I sketched it roughly onto the calico.
It looks pretty decent I think, time for the next stage of toiling.

Bum Enlarger

Swans are not shaped like humans, this is fairly obvious. Some serious bum padding is required to give the skirt its proper shape. I made two toiles, a bum pad, and a bustle, to see what worked the best.
I added ruffles to the bum pad the beef it out a bit. And they are adorable.
I used a laughing moon short bustle pattern.
Plus ruffles.

Being larger, this will give a more dramatic shape to the skirt. So I think it is the one I will go with.

Basic Block Fitting

I have until early December to complete this entire project before the photo-shoot and marking takes place, its do-able, but its not going to be a lazy month and a bit. I made the basic block and had a fitting

I'm not sure what happened, I must have miss-read the measurements, because the hips were ridiculously out, a good 5cm on each side. Other than that it fitted pretty well. And I drew on a rough corset shape.
I made a corset pattern and toile from that, the upper and lower lines were nice, but the fit around the waist was far too tight.

Finalised Initial Design

I'm sure they will be altered as I go along with the making process. But these are the designs as I start. I will make the helmet, pauldron, and gauntlet out of plastazote, moulded and painted to look like armour.
The chain-mail around the chest and neck will be either crochet, knitting, or lace. I have yet to decide which.
The skirt will be of quilted silk in two parts (wings), given shape with a bustle or bum pad. The colours will be all be in varying tones of bronzey/gold (the mythical colour in my head is somewhere between the two), with the armour being darkest, the skirt the lightest (almost white) and the corset somewhere in between.